So, building a airplane actually isn’t that hard. It’s strikingly similar to building a lego set, except with power tools, five times the amount of pieces , and, in our case, a professional telling what and how to do it. Also, your life depends on how well you fit the legos together. This sounds like a lot of hard work but it isn’t. The hardest part of building an airplane is the amount of time it takes. For instance, building and painting the rudder pedals took a day and a half. this usually stops pilots from finishing their build.
Having Mr. Rob there to help us saved tons of time. On top of not having to inventory the entire airplane’s parts, he helped us figure out the manual. I can not stress enough how much help this was. The inventory alone would have taken several days, and the manual skipped over some interesting parts, like how to install the rudder pedals. Mr. Rob also gave us advice on what to do with our airplane. For example, he gave suggestions on which avionics, aka flight instruments, to put in our plane.
Mr. Rob also kept us entertained. Apparently, like my dad, Mr. Rob knows everybody in his home town. We had constant visitors, ranging from his dad, who bought us lunch and had tons of interesting stories, to the owner of the largest trucking company on the east coast. They were all cool in one way or another. On top of all the guests, Mr. Rob had three dogs. Rudder, a old, brown bird dog who could barely hear, Birdie (I’m not sure how you spell it), a middle aged gray dog who looked like a good runner, and Banner, a cute puppy with one brilliantly blue eye and one blue and dark brown eye. Banner’s blue and brown eye gave him the appearance of winking at you. Both Rudder and Birdie were amazingly trained. Banner was as well trained as could be expected from a puppy. All in all, both the friends and the dogs provided an interesting and enjoyable break from work.
The dogs weren’t the only animals. Almost every night, one or two birds managed to penetrate the walls of the cabin we were staying in. Without fail, these birds provided comic relief as me or my dad tried to shoo them out of the house. These birds were fearless warriors and I had to dodge an attack more than once. However, it is normally whoever has the biggest stick who wins the wars. Since birds don’t have hands and me and my dad had a broom, we always won the frequent skirmishes.
The trip was loads of fun and I can’t wait to continue tomorrow.
Day five started with a bit of a different energy. Today we were wrapping up and going home for the weekend. We needed to work the farm, and also there were a number of things we’d be getting from home while we were there. Things like some tools I now knew we’d need, a sleeping bag for Spork, a tooth brush for Spork (yes he forgot a tooth brush. It was one of 7 things he didn’t think to pack, or decided he didn’t need. Teenagers!)
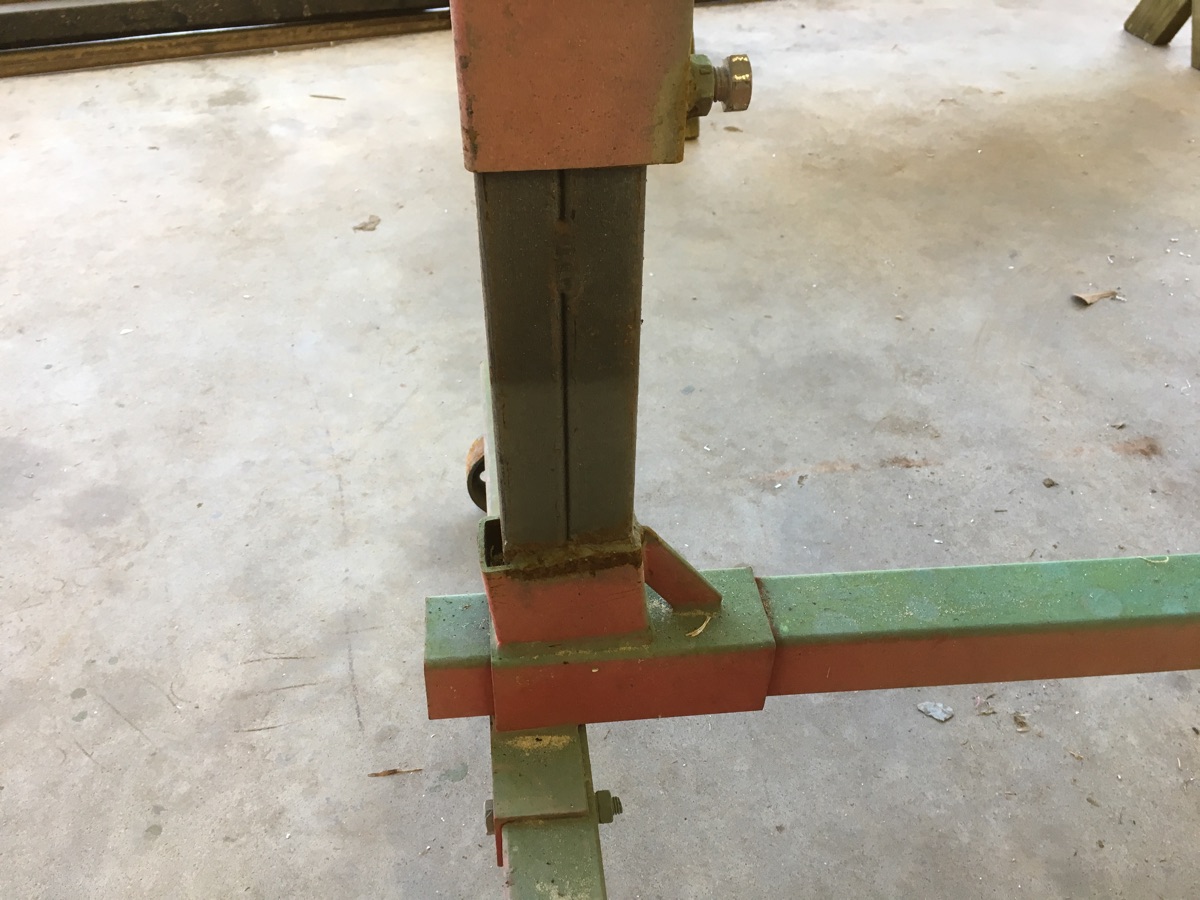
I also needed to modify some engine stands that Jenny had very kindly gone and picked up for me at Harbor Freight.
High tech measurements of the engine stand standoffs
Robbie uses engine stands to hold the airplane fuselage. They allow him to spin the plane this way and that so working on it is easier. Of course, you have to modify the engine stands to hold an airplane. I took some pics of the mods so I’d know what to do when I got home. I neglected to take any actual measurements because of course I hadn’t brought a tape measure and I never could seem to locate Robbie’s.
Cut and welded with extensions
I wasn’t sure if these stands would be required for us when we first started work but after about 10 minutes of using them, I couldn’t imagine any other way of doing it.
How the forward fuselage attaches to the engine stand
It was hard to get good pics in the hanger. Robbie has the entire door made of the clear material you see, meaning that awesome light was there for working, but terrible light was there for pics. There is a 1/4″ x 5.5″ bolt threaded through the modified engine stand hold offs, then an aluminum spacer, then some nuts and washers. It holds very well and allows the entire fuselage to be spun 360 degrees.
Spork and Robbie spent their day working on the flying wires, tweaking cables, installing shim washers, etc. There was a lot of time and experience involved in rigging the tail of this airplane.
I spent my day drilling and adjusting the stringers. Those are the curved, shiny metal tubes going from front to back of the airplane.
View of stringer from the cockpit
Here you can see the stringer viewed from the front of the airplane. Each one of the little grey standoffs had to be cut to the right length to match the inside of the stringer, then a matching hole had to be drilled in the stringer. Getting the first one done was kind fun. Cut, drill, bow the stringer, look for the right amount of curve. Kinda artsy getting it to bend just right, and have the right amount of standoff.
Aligning the stringers left and right
Then you move to the other side. The lines had to be matched perfectly so that from the tail, the plane looks symmetrical. Nothing about it was hard, but it took three times as long to do the second side as it did the first. The curve had to match overall, and be curved at the same place. It isn’t just one big long curve, it changes over the length. There was a lot of look, remove, file, reinstall, look, remove, wash, rinse, repeat. Still fun though.
About this time, we heard a plane come over head. We had talked to Marco’s dad the day before. He has a live fish delivery company, the largest in the country. He hauls all kinds of live sea critters all over the country. It was a really interesting niche and he was a great guy. He mentioned he’d send Marco over the next day if he could. We dropped our tools and went outside to see Marco.
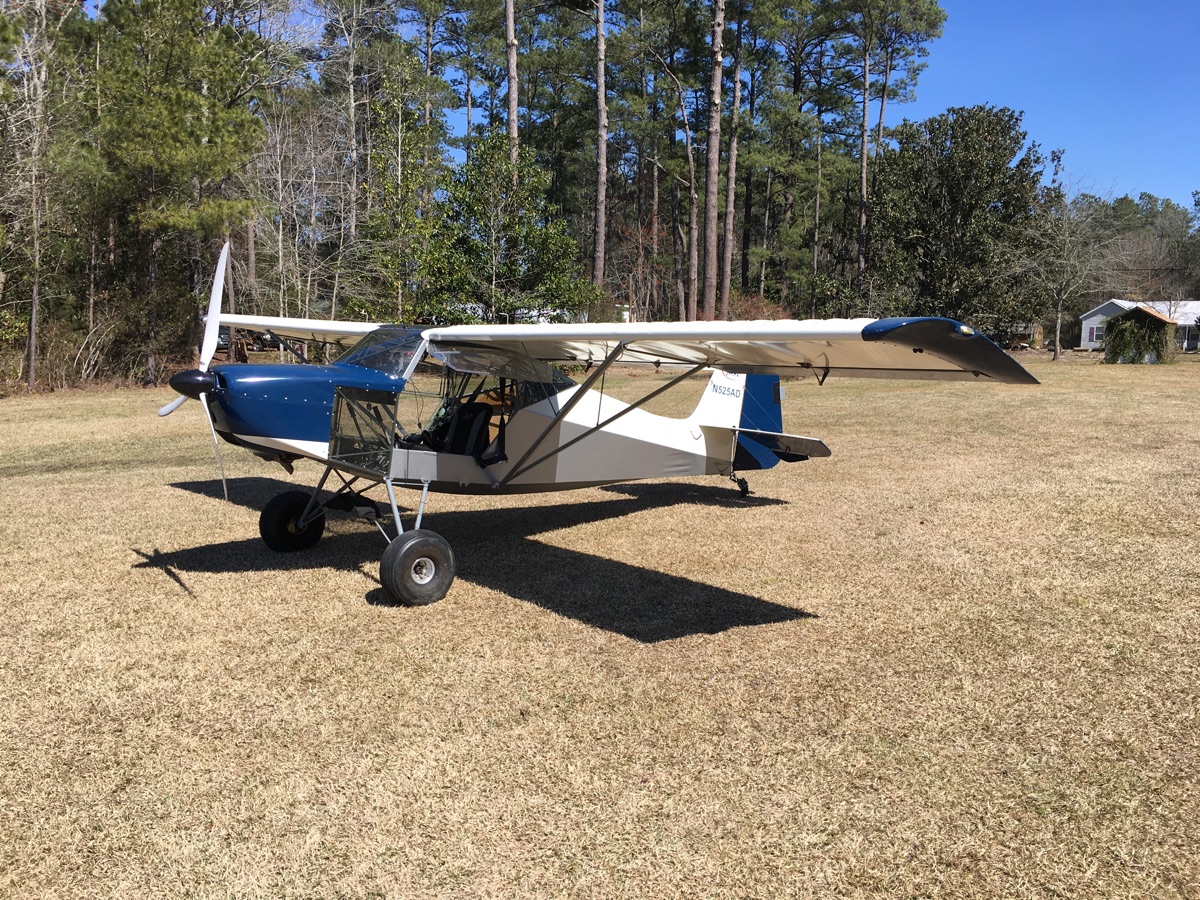
Robbie immediately was worried. Normally you approach from the cleared side of the field and land towards the trees. But it was really windy and blowing the wrong way. That meant approaching over the trees which made it much tougher. Plus Marco wasn’t in a SuperSTOL, he was in its brother, the Highlander. A very capable airplane but not one with the short field craziness of the SuperSTOL. However, it all worked out ok and you can see the approach from Marco’s perspective as he has a video he uploaded to youtube.
We chatted with Marco for a few minutes but I asked if I could get pictures of his bird. When you are building, nothing helps more than seeing someone else’s airplane to see how they did it.
Highlander from the frontHighlander from the backBaggage area of the Highlander, exactly like our airplaneLeft side of Highlander panelCenter of Highlander panelRight side of Highlander panelWindows that can open in flight, I want to do this to our planeNow it is an airport. The view of the hanger where we were working, and the Highlander sitting quietly
Marco spent a good bit of time talking with Spork about finding jobs, a career in aviation, how to get started flying, etc. Marco is a corporate pilot for a company in Kinston and flies jets for a living. Spork listened attentively.
With pics done, and chatting over, Marco fired up and took back off. I captured that side of things from the ground.
With the excitement of having an actual airplane here over (it really was awesome), we went back to work.
I have no idea what I’m doing
No really. I don’t remember what I was working on here. Gary, our EAA technical advisor had one bit of advice for me above all else. He said I needed to be in some of the pictures to prove that I actually was present for the build. Seems funny, but when the FAA looks at your records, if they don’t see you in the picture they aren’t comfortable that you are the one that was behind the camera. Apparently it has come up more than once.
Every once in a while after we got that piece of advice, Spork would grab my camera and snap some shots. So consider this one proof of life, but not proof of memory because I just don’t recall what I was working on at this moment.
Finished for the day
As the day came to and end, we scurried out of there about 5pm which felt early. We left Hobbes to keep an eye on things while we drove the 2.5 hours back to Raleigh. We had a super busy weekend ahead and we were planning on being back in town Sunday night to get started again first thing Monday morning.
Robbie has an Alaska style cabin that he built at the end of his runway. It has no electricity, but it has LP, battery powered lights, a stove, a rudimentary sink, etc. There is a futon downstairs and a bed upstairs.
On day one, we made it out to the cabin to find that there was a bird that had taken up residence. After some shooing and hilarity, we finally got the bird out. I’d discovered that Carter had forgotten his sleeping bag on the way down, but there was heat in the cabin, along with blankets and whatnot. We’d be fine. After saying our goodnights, we built a fire in the little fireplace because the heat apparently didn’t work in our LP heater. Not to worry, we’ll fix that tomorrow.
You see, part of picking early March was I knew the weather would be cool but not cold. Robbie had heat in the cabin, but of course no A/C. If we waited till later in the year, we’d be sweating in this little Alaska cabin, but with North Carolina heat. Better to enjoy being snug in the cabin with the heat going in early March.
Except as I said, the LP heat didn’t work. But no worries, we had a fireplace. In fact we arrived to find a fire already going, and the lights on. The cabin was warm and cozy, and it was a very nice welcome.
Snow on the bridge, the morning view from our cabin
Except the fireplace made the bottom floor warmish, and the loft where I was, a sauna. I was laying on the bed in shorts and a t-shirt sweating while Spork snuggled in on the futon. Since he’d forgotten his sleeping bag, I gave him mine with the thought that it was warmer where I was. And it was. Till the fire went out. You see, in the dark, we’d walked right by the stack of wood available for rebuilding the fire. During the night, in the cold, I didn’t feel like venturing out to find more firewood.
So the fire went out, and then it was the same temperature above as below, which was about 30 degrees. There isn’t any insulation in the cabin so without constant heat going it quickly cools to ambient. I lay there, in the dark, wrapped in every blanket that was available, freezing and picturing Spork snug in my sleeping bag. It is a really nice sleeping bag, more like two huge heavy quilts sewn together. It must weigh 15 pounds. The next morning, when I finally braved the cold enough to get into my frozen clothes I found Spork asleep under what I can only describe as a thick sheet. It certainly wouldn’t have qualified as a blanket to me. My sleeping bag was laying beside him, still unpacked. At least I had real blankets, he’d slept all night basically bare. I fussed at him for not unpacking the sleeping bag and using it. But at 13, he’d simply crashed and went to sleep after an 11 hour work day. I felt like a bad dad but he just thought it was funny.
Day 2 Robbie replaced the heater in the cabin with a new one, so this time we had LP heat. We also knew more about where the wood was for the fireplace so we could keep the fire going longer. We built a nice fire, chased the birds again, several times, and turned the LP heat on low. Spork snuggled into my sleeping bag and I used the blankets again. Again early in the morning I woke to a cabin that was cold. Not frozen, but certainly not snuggly and warm. I’d say it was 40 degrees in the cabin, perfect if you are in my sleeping bag (I made sure he was in the sleeping bag this time). Not so much under the blankets I was using.
Day 3, I had this thing figured out. I had the fireplace ready to go when we walked in. I struck a match and had a fire going in just a few minutes. I turned the LP heat to high, the fireplace fully stuffed, and went to bed. It had to be 95 degrees in the loft this night, and it never stopped. I was dying of heat exhaustion. Finally I opened a window, just a crack, to let some air in. Our tweety bird immediately flew in and again we spent the night chasing birds around the house. Spork had been asleep just long enough to Zombify so he was stumbling drunkingly around trying to help while I cursed this bird. This took about 30 minutes. Finally we got him out and I went back to bed, to sweat, and sweat, and sweat. Turns out instead of a low of 30 degrees like we’d been having, it was only going down to 47. We’d finally gotten the heat figured out just in time to not need it. I roasted and barely slept.
By day 4 we had things figured out much better. The birds had apparently moved on to another house and we were able to match heat and cold pretty well. There was some angst as we wondered if our LP would run out during the night but it all worked in the end.
Day 5 we tidied up the cabin and locked it up. We would be back again the following week for another five days. This time with more sleeping bags and kindling to start a fire.
I accidentally included some of the pics from day 4 on day 3’s post. At this point, with all the posting that is still needing to be done, I’m not going to back and fix it. As long as the work is recorded that is good enough for record keeping.
Seats before Spork finished the seat backs
Day 4 was seat day. I started first thing on the seats and worked nearly all day on them. Fitting, bending, drilling, reaming. They were way harder than I thought they would be. Even the seat backs were a pain as the bushing was hardened from welding and wouldn’t take the bolt. I broke off drill bits trying to drill them out. I jammed bolts in the fittings and had to drive them out with a punch and a rivet gun. Again, I longed for tools I knew were sitting patiently in my shop. A press. A mill. Robbie had everything we needed, but not the things I had. Of course, now that I am home, he has things I don’t have and I’m wishing I was at his shop with his tools. Such is the way of building I suppose.
Once all the drilling, reaming, broken bits, cursing, etc were over, I got the seats installed. The seat backs are mega tight. Like the airplane rolls around on the stands when you try to fold them flat and the hinges groan in complaint as metal rubs on metal. This is an area where I don’t see why it is so tight. Maybe the powder coating took up too much room? Maybe there is a bit of warpage? However these are the seats, and the seat backs at that, not a control surface or piece of avionics. I’m going to let them wear in and see if they loosen up before I remove any metal. If six months in I think they are still too tight, it would take about 5 minutes to remove the seats and fix them then. No need to stress over it now when there is so much more to do.
Spork spent the entire morning organizing hardware. Like 6 hours. This is the mountain of hardware that spilled from the boxes when we first opened the kit. Robbie knows where everything is, and more importantly, what everything is. I however don’t know (I do now) the difference between an AN3-12A and an AN4-11. I need labels. Spork put in the hours and became the master organizer. Then he worked with either Robbie or me to help either put the seats in or work on the tail feathers.
Robbie pretty much worked on cables or the tail feathers all day. There was a lot of adjusting, measuring, testing, and twisting to get them aligned correctly. We had to pick between the tail flying a bit negative which is the factory suggestion or flying neutral as the Highlander does. Neutral helps with heavy loads, negative is better with lighter loads. We don’t plan to fly moose quarters in Alaska, instead opting for kids on joy rides from the farm. We went with 1.5 degrees negative. The factory recommends 1.6 degrees and the Highlander would have been 0 degrees.
This was day four of building. Each day started about 7:30 am in the hanger after sleeping sorta ok in the cabin. We pretty much worked till a late lunch, stopped for a bit to eat right there where we were, then went back to it till around 6pm or so. It wasn’t hard work, not like farm work or working cattle. But by about 4pm I was starting to drag a little bit. I made sure Spork took breaks to play with Banner when he could.
Spork and Banner
He’s only 13 and he still put in over 8 hour days. I’m supposed to be used to long days but I found myself starting to flag a bit by about 4-5pm.
On day four, I remembered I had a bottle of really good whiskey in the truck. I stopped about 5pm, grabbed a couple of glasses, and poured about 1 fingers worth of whiskey, neat, and slowly sipped as I worked. The last hour or two suddenly went much better. Despite all warnings to the contrary, whiskey is apparently a required component of airplane building. (Don’t worry Grandma, at the end of the day we’ve already done the important stuff).
Day 3 for me consisted of rudder pedals, rudder pedals, and more rudder pedals. Robbie had already done the initial assembly. He told me that fitting the rudder pedals was one of the harder jobs of the build. Really? They are already built? How hard could it be.
Turns out, not that hard. But it took time. I must have installed and removed the rudder pedals 10 times. Maybe more. Plus I had to buff, polish, file, shim, etc. nearly every mating surface to get the pedals to run right. On a tail dragger, the rudder pedals are arguably the most important flight control. They are also a welded assembly, which means they are heated and cooled during the process, causing warpage.
Rudder pedals being assembled on the bench
They apparently never run straight out of the box. That means putting everything in place, tightening all the bolts (8 bolts, nuts, washers, and stand offs/shims), then finding out where the bind is. Remove everything, and then file, sand, buff until you think maybe that is enough. Be careful it’s not too much! That would make them sloppy and sloppy is bad. Reinstall everything and… still tight. Wash, rinse, repeat until 9 hours are gone. That is installing the rudder pedals. Hard? No. Tedious? Yes. I REALLY wished I had access to my big belt sander though. That would have made things progress much faster.
One thing that made the job harder was the instructions. They were, um, incomplete. Here is page one, step one.
Rudder pedal installation, step 1.
Oh, ok. Use some certain hardware. Expect to do some massaging. Insert tab A into slot B. Sounds good. I can do that. So, how do I go about shimming, adjusting, etc? Lets look at step 2.
The very next page of the manual.
Um, where is step 2?
Up to this point, I’d just been doing what Robbie said to do. I hadn’t really been reading the manual. This was my first attempt at reading the manual. It read sorta like this in my mind.
Having read step 1 of installing the rudder pedals, and then envisioning doing it green, by myself, I considered going over and hugging Robbie and telling him how much I appreciated him. I refrained, but only just.
Once the rudder pedals were fitted correctly, I took them out and prepped them for paint. Once again I missed my shop because at home, I have a nice sand blasting cabinet. Not nice because it is high end. It is decidedly low tech. But nice because it is the single best Craigslist buy I ever made. Best $100 dollars I ever spent.
However instead of sand blasting the pedals in about 7 minutes, I spent about an hour hand sanding every little nook and cranny I could reach. I then drove to the hardware store where I bought a drill operated Scotch Brite pad and polished up the weldments and other areas I could not reach with sand paper. Call it 3 hours total from done fitting to ready to paint. It would have been 5 hours and seven minutes to drive home to Raleigh, sand blast the part, and drive back to Grantsboro. Believe me, I thought about it.
Rudder pedals painted and drying in the paint roomSpork working on the seat backs
While I was working on the rudder pedals, Spork was working on the seat backs. He had to trace, cut out, file, and sand the metal backings of the seats. Unlike his father, he did the job with no whining and no rework. He just traced, cut, and finished like it was an every day thing. It is a little unnerving and rather annoying how he picks things up so well. On day one he couldn’t operate the drill to change drill bits. On day three he’s doing metal fabrication.
Seats before Spork finished the seat backsDrilling out for clecos on the cargo bay pans
With the rudder pedals drying, and the seats installed, I went underneath the plane to drill out for the cargo bay floor pans. I’m wearing my sunglasses because I’m too lazy to go get safety glasses. I wear Oakley sunglasses (thanks Ron!) and they are rated as safety glasses so I was good using them instead. I had a bit of a Stevie Wonder thing going on, but luckily I was able to drill all the right places without any screwups.
Carter and Robbie installing the tail feathers
While I was working on the bottom of the airplane, Robbie and Spork were installing the tail feathers. This is harder than it sounds because there are some very critical adjustments that need to be made during install. Once they are made, they are permanent. One decision is how much angle the horizontal stabilizer needs. Zero degrees would be perfectly in trail. No down force, no lifting. That is what the Highlander has. However in testing the factory determined that a negative 1.6 degree set to the stabilizer was better. Robbie and I talked about it for a bit and we decided to go with the factory recommendation. Robbie spent a good hour just measuring and tweaking the adjustments and got it to 1.5 degrees. I called that close enough and he and Spork drilled the holes and permanently locked everything in place.
Riveting the bottom of the airplane
While the boys were tweaking to the tenth of a degree, I kept drilling and riveting, disturbing their work. Thankfully they were good at what they did and didn’t mind my working.
Tail feathers, permanently installedFuel drain sump installedFinal steps of the day. Hobbes is sitting on the new seats, styling
These were just mockups of the seats but it looked really cool to see something that looked like an airplane.
Day 2 started early. Unlike day 1, we already had some idea of what we were doing. Plus, we were frozen from the lack of heat and blankets the night before so may as well go to the hanger and start building a fire in the fireplace.
We got things going in the fireplace, then went back to work on the floor pans. We made really good progress and it felt great to be able to work without needing stop and ask questions every few minutes.
Once Robbie arrived, he showed me some lexan pulley covers that he’d made for his airplane. They are to cover the control surface pulleys that are located just behind the seats, in the baggage compartment.
Pulleys just behind seats in baggage area
There is nothing in the design of the airplane to protect the cables, and the cables are what keep the airplane under control. One errant strap from a bag getting caught in the cables would lock the controls in whatever position they jammed in. This could be fatal. Robbie had designed and created some simple lexan covers that protected the pulleys. He set me to making my own set. A couple of hours later, I had a set of covers that were exactly, perfectly, wrong. I’m not very experienced on a brake, and I didn’t have a bandsaw to do the cutouts. As I worked, I thought that this was silly, Miguel has forgotten more about running a brake than I’ve ever known. After finishing the covers, I decided that it would be time better spent having Miguel make the covers on our brake once the plane was home and we were making them to fit the actual airplane and not just a pattern.
Frustrated with the lack of success with the covers, I moved onto something simple, the cockpit floor pan. Robbie showed me some additional work that needed to be done to it besides the normal cut, fit, drill. There were some extra relief slots that needed to be made to accommodate the rudder pedal attach points. The easy way to create the slots was to drill the holes the same as where clecos normally go. Then take a step drill and drill them out to the size of the cutout. Then it was a simple process of cutting with shears to the circle and we had perfect slots. Unfortunately someone was visiting about this time and I really wasn’t paying attention when I was drilling out the holes. I unfortunately drilled out one of the cleco holes into a large hole instead. With this now oversized hole in place, I then needed to create a patch for the hole (after some cursing), which then took a couple of tries to get correct because aluminum has a grain and the patch needed to match the direction of the floor pan. Something I learned after making the first patch incorrectly.
Floor pan in cockpit, with patch in place.
At this point, I was thoroughly frustrated. I expected to make some mistakes along the way, and none of these was really that big of a deal. But two back to back mistakes, on day two, had me pretty frustrated.
Fortunately at this point, I began working on installing the fuel sump point. This was a good opportunity to get back on the horse and do something right. I spent an hour doing something that should have taken 15 minutes, but it came out perfect.
Carter had spent his time installing the pulleys for the control system. He and Robbie also built the flap handle.
Flap handled installed and ready for some flaps
It is surprisingly complicated and took a good bit of time, but once it was done they got it installed and it worked perfectly the first time!
With those successes behind us, we installed the control sticks and mixers. This went well and finally we moved onto the rudder pedal assemblies.
Rudder pedals being assembled on the bench
They were just getting started when we called it a day. Fortunately we had Robbie because the instructions for the rudder pedals were pretty much missing from the manual. Step 1 was there, and a small picture. That was it. No step 2, 3, 4, etc.
End of the day, Hobbes checks out the progress
With our day in the shop ended, Spork and I headed out to dinner in downtown New Bern. We went to MJs Bar and Grill. We’d been there before when Spork was much younger, and he had tried alligator tail for the first time. It was a big event for him, trying something so new and strange.
Spork eating alligator bites at MJs in New Bern
Now years later, we came back to the scene of the crime and he had second helping.
We started about 7am and finished about 6 pm. After dinner we returned to the cabin and I made a fire and turned the LP heat onto full. We weren’t going to be cold tonight! Except it was almost 20 degrees warmer this night instead of last night. With all the heat going, we absolutely roasted in the cabin. The birds came back when I opened the window to get some air and we spent a good 30 minutes getting them out of the cabin. After the birds were gone, I had a bug crawling on me, on my face. I knew it flew there, and I’d seen a wasp previously. Nothing like a wasp on your face, in the dark, while you’re sweating. Finally I used an iPad light to see what it was and it turned out to be a ladybug. Crisis averted, we finally got a few hours of sleep before starting day 3. Our adventure continued.
The plan for building the SuperSTOL was to get a big head start by hiring an expert to assist with the build in the beginning. After much wrangling of schedules, we finally happened upon March 5th for our build beginning.
Spork and I travelled to Grantsboro Sunday afternoon so that we’d get in around dinner time. Even though I’d been there before, I wanted to get in before dark.
Hobbes loaded up and ready to go
Besides taking everything we could think of, we also brought along Hobbes, as in Calvin and Hobbes. Hobbes is the mascot of our build and once the plane is done, will have a place of honor in the airplane.
I’d asked Robbie before we came down if we needed to bring anything. A bunch of acetone and a few odds and ends were it. By the time day one was over, I had a laundry list of things I wish I’d brought. Robbie’s shop has everything you need to build an airplane. Custom stands, custom tools, a paint booth, everything. But it doesn’t have my belt sander with a scotch brite belt for cleaning up edges on cut aluminum. Nor my TIG welder, or my set of dial calipers, or my entire machinist toolbox for that matter, or any of the other things I have around that I missed. Had I started the build in my own shop, I’d have been in trouble for all the missing tools that Robbie had like cleco pliers, custom stands to hold the fuselage and wings and allow them rotate, etc. Overall it was an excellent idea to work at Robbie’s first, but about once per hour I wished for some tool I’d known to bring with me.
Day one started with unpacking.
Spork cutting boxes out of the now unwrapped fuselage
This was like Christmas, but on a scale beyond what even adult Christmas would be like. There are literally thousands of items (if you count hardware). It’s like two of the biggest Lego sets in the world got together and had a baby.
Spork cutting more boxes loose and packing materials off the fuselage
The big pieces are easy enough. Wings? Check. Fuselage? Check. Wheels and tires? Check. But all the other little bits went everywhere.
Every single article I’d ever read about building your own plane says, “Take the time to slow down and do a proper inventory. You don’t want to be on year 2.5, reach for part ABC123X, and find it missing. Calling the factory to tell them they forgot to send something later won’t go well.”
So I pulled out the inventory sheet and started ticking off items. Robbie cautioned me that taking inventory would eat up a lot of build time. He shuffled through all the items with an experienced eye, and immediately noted things that were missing. Items like the slats, the aileron ribs, and a handful of other items as well.
Boxes were crushed during shipment, but the items inside were fine
Also missing was the upgraded tail wheel I’d ordered but hadn’t shipped as promised. After we sorted and shuffled for a while, Robbie declared everything else of substance was here and we could start.
More pics of damaged boxes in the fuselage
The whole process took from 8am till noon. Had we pulled a proper inventory, I’m confident it would have taken till Wednesday with all three of us working. Later Spork decided to organize the remaining hardware, already seriously dwindled at that point. That alone took him 8 hours.
So three days of build time was saved simply by having someone experienced on hand who knew the kit inside and out. Then when we started, I looked at page one of the manual and was immediately confused. Robbie just grabbed some parts off the pile, handed them to me, and gave me instructions to get me to work. We hopped into action and started the build with a quick reference of the manual by Robbie, and barely a glance by myself.
I know I’d have agonized over the manual for hours, and made multiple calls to the factory. I’m not saying the manual is no good or impossible to read, but it is in a language I didn’t yet speak, asking for specific parts that were laying in jumbled pile on a bench, with one picture to reference and often instructions that were incomplete or in some instances missing entirely. I quickly reverted to just asking Robbie and continuing to work. The hours saved by having someone on hand are immeasurable. But I’d estimate that after the buyer’s remorse, the confusion of trying to figure out the manual, and the angst over doing something wrong because I didn’t understand, I’d have wasted the first month of build time and barely have gotten anything done that we had done by the end of day one.
Once we had the plane unwrapped, we mounted the fuselage on Robbie’s modified stands. That only took a few minutes.
Modified engine mount stands from Harbor Freight hold the fuselage fore and aft
Then I went to work on the floor pans while Spork went to work drilling holes.
Drill, drill, drill
Actually redrilling, as the holes existed but they were now covered in powder coat. This isn’t an RV with its thousands of holes, but there are still a lot of holes. Carter spend many hours drilling while I cut, filed, drilled, and deburred corners and edges on floor pans till they fit perfectly.
Rick helping on the build
My friend Rick stopped by and worked on day 1 as well. He took some of the initial projects and knocked them out, sharing hard won tips along the way. Rick is 22 years into an RV build. Actually it is two builds. He and his partner built it to 99.9% done, then things stopped and it never flew. He finally got back to it after his partner died and he decided it needed to be redone to bring it to modern standards. He is nearing completion again. He has a wealth of knowledge in working with metal, avionics, etc. and we were blessed to have him there helping, especially at the beginning.
Spork and Banner
Work was often interrupted for Robbie and Jenny’s new puppy, Banner. He was motion and playfulness all the time and I’d often see Spork take a break to do what you see above. Banner was into everything, and even took a bag of rivets out of the kit at one point and started eating them. He was a hoot and didn’t cause any real trouble. The picture above was the first good picture I had of him. The rest looked like this.
All motion and blur.
Day one came to and end about 6pm. We’d worked on the floor panels, drilling the holes, and getting everything sorted. Rick had made the ELT pan and had it clecoed in place. Robbie had worked on the rudder pedal assembly and had gone through a bunch of the parts and combined them into subgroups so everything needed was together and ready to go to work. All in all, a good start.
In five days me and my dad are going to go to Grantsboro, NC and start to build some airplane at some place for who knows how long. Supposedly, the average build time for this kit is one thousand hours which, apparently, is a short build time. On top of that, the wings are prebuilt, so the build time should be shorter. Still, my dad is in charge so… yeah. On a more hopeful note, we already have decided that the airplane should be called the “Transmograflier,” that it should be cardboard brown, that a stuffed tiger wearing flying goggles and a flight jacket should sit on the dash and that it should have a picture of Calvin and Hobbes flying in a box on the side. Now, all we have to do is put in the x amount of hours needed to build and paint the airplane, find the space needed to keep the airplane in, clear a runway on the farm and learn how to land on a long dirt strip that’s surrounded by trees and isn’t straight or level. This should be entertaining.
I arrived at Just at about 6:45 am on Monday. They supposedly opened at 7 but I’m on Lombardi time. I was pleasant surprised to find the gate already open and a light on in the factory. I pulled in and got out, walking in to find a lady heading to her area to go to work. She stopped however and helped me. I explained I was picking up an airplane and that I needed air. She promptly helped me with both issues.
I later learned that she was actually Troy’s sister, Stephanie I believe it was. Troy is one of the two owners of Just Aircraft and it seemed through conversation that all of his family had worked there at one time or another. Stephanie became my main point of contact for the rest of the morning and we spent a good bit of time trading stories and walking around looking at airplanes. She does all the covering so she gave me a machine gun list of dos and don’t on proper aircraft covering. Unfortunately I’m not far enough along in my learning to absorb everything she was telling me, but I assured her I’d be calling her back for insight as I got closer to doing the actual covering work. She happily agreed.
She did spend some time pointing out some of the options that seemed to be popular with their customers but before that, I wanted to see my airplane.
My bird, at the factory waiting to be packaged to loadFactory completed wings, with my name on them
It was pretty cool seeing my name on the airplane there in the factory. I can’t think of when I’ve ever gone to the factory to pick up something for myself. I’ve been on many Gold Key trips where a John Deere customer picks up his tractor at the end of the line and drives it off, the first person to operate it. It is really neat. But this time, I was the customer. Except it was “some assembly required.”
More open inspection panel in the tail feathers
This was one option that Stephanie pointed out to me. It allows a much better inspection than the traditional inspection ring found on normal aircraft. It also happened to be aircraft 510. Mine is 511. So this is the sister to my plane. It is heading to a customer in Florida as a replacement for the SuperSTOL he’d crashed. The crashed one was in the factory as well, being rebuilt.
Inspection panel diagram for the wings
Stephanie let me take a picture of her personal schematic for where to put inspection panels.
Big work light from ATD
This was a light I noticed them using in the factory. It really added a lot of light to a work area.
Advanced Tool Design
May need to pick one of these up.
Some serious packaging
Most of the boxes of stuff were placed in the fuselage, then everything was wrapped, taped, secured, wrapped, duct taped, and then wrapped some more. They say to estimate 1000 hours for the build time of the airplane. I expect at least 40% of that time is unwrapping everything.
Finally on the way
I was finally loaded and left the factory a little after 10am. My first stop was to get fuel. I didn’t dare try to drive around and find fuel the night before on low tires. The first place I pulled into had truckers blocking the pumps and they wouldn’t move. After the adventure of the previous evening, I just wanted to gas and go but no, they were sitting there texting. I finally gave up and headed off to the next place, grumbling about stupid texting truckers. Since I need diesel I can’t just stop anywhere and as I drove away I admonished myself for not being patient. Now I’m worried about running out of fuel.
But soon, I found another place and they had fuel. Goodie. No adventures, no snacks, no bathroom breaks. Just fill up, get on the road, and start the epic drive to Grantsboro.
As I’m fueling, I hear a woman yelling. Sounded kinda angry. Seriously? I really just need to get in and out of here, I don’t need drama. I leave the pump running and walk around to see what is going on. I see a woman, elderly, yelling at a dog who is running loose. He is obviously VERY happy to be running free and he is NOT going to be caught anytime soon. The lady is yelling his name and walking around following him. A few people kinda join in and walk with her, hoping to maybe corral the dog. She doesn’t seem to really pay any attention to us, instead fuming and yelling at the dog, and not coordinating in any way with the people trying to help.
I’m not the dog whisperer, but the dog is obviously just recently free of being cooped up (she later comments he’s been cooped up for three days, traveling) and her yelling is only going to encourage it to keep going. After a lap or two of the store, running into the road, across the parking lot, into another road, etc, a lady who has walked out of the Hardees across the street opens up her to-go order and holds out some food for the dog. The dog comes up, very interested in the food, but VERY careful not to get close enough to be caught. He only approaches from the food hand side of her body, or from behind, so that she can’t use her off hand to grab him.
At this time, the yelling woman’s husband shows up and he is yelling at the dog as well. Their version of instruction for teaching a dog is to yell at the top of their lungs, “Sit”, “Bad Dog”, “Come here.” As the lady is making real progress with the dog, I politely say to the lady that maybe she should stop yelling a minute and let the lady catch the dog with food. I don’t know if the lady ignored me, or honestly couldn’t hear me. She was old and could have been hard of hearing. As the dog would calm and get closer, the two yellers would close in, yelling, and of course the dog would scamper away.
After watching this for several minutes, I proceed into the store and buy a Slim Jim. I cut it up into bite sized pieces and join the lady in feeding the dog. The dog is wary of me as well, and smart. Only approaching from safe angles and staying as far away as possible. Again, the couple keeps yelling incessantly. Finally I stand and step up the man, and explain that I think it would be best if they backed away and stopped yelling, and maybe then we could catch the dog. The man yells to his wife, who puts in another 45 seconds of yelling for good measure before finally backing away.
With quiet now restored, the lady and I work together and get the dog to eat. It is still very wary but after most of the food is gone, I finally snatch the dog as it grabs the food from my hand. Don’t mess with a farmer, I’ve grabbed bigger things than you, pup. He immediately goes limp, knowing he’s caught and in trouble. The lady marches up to me and I start to hand her the dog. She’s commenting about how much trouble he’s in and what a spanking he is going to get. I hold onto the dog and look her in the eye. “Don’t hit that dog in front of me.” Firm. Clear.
She pauses and then leaves with the dog. Doesn’t thank me. Doesn’t thank the lady who fed her breakfast to the dog. Doesn’t offer to reimburse us for the food we’d fed her dog. I honestly think she was so mad it didn’t even occur to her and it was just an oversight but whatever. Dudley Dooright deed done for the day, I thanked the lady who fed her breakfast and a few other people who’d stayed around to help.
So the lady in the van the day before had said to me that she’d prayed for help and then I’d shown up. It was polite of her to say but I was just driving along. No big deal.
Then this day, I’d been delayed at the factory, and then sent away from another gas station to this one, to be here exactly when this dog got loose. I’m sure despite the yelling, the old couple were nice folks and probably prayed they would get their puppy back safely. They were too old to chase it around and obviously didn’t know how to catch it. Enter an animal farmer, towing an airplane, who just happened to be at the pump near their hotel right then. I don’t know if that is divine intervention that put me there, but I hope so. How cool is that, to be the guy God selects to go help? Nobody likes being picked last at kickball. Being picked first makes you pretty proud. Being picked first by God to answer a prayer? How cool is that?
I stopped a few times on the way home to check straps and make sure everything was riding ok. I made it to Grantsboro about 5:00pm and Robbie, Jenny, and Robbie’s dad and neighbor all helped unload the airplane and all its associated goodies. Then it was the 2.5 hour drive home in the dark and the rain.
Not quite 1000 miles
It was 926.6 miles total trip to get the airplane. I listed to Artemis on Audible for most of the trip and between the story, and the side adventures, the time actually flew by and was quite enjoyable.
Now it is time to print out the build manual, get tooling in place, and be ready to start on this airplane on March 5th.
For the record, actually picking up the plane wasn’t really an adventure. The only thing that went “wrong” was that I expected to pull up Monday morning at 7am and find a plane wrapped, boxed, and ready to load. What I pulled up and found was the the plane was there, by the door ready to load, in all its pieces and parts. Nothing was wrapped or packaged. It ended up taking three hours with three of their folks working on it, to get everything packaged and ready to go. I remember thinking the charge for packaging of the kit was a bit excessive when I looked at the quote. After watching the amount of care, plastic, padding, and duct tape that went into prepping for shipment, I think they may be undercharging.
Also as I was standing there talking to people, I found out why the plane was not ready. Not because I asked the question, but because they started telling stories of the different ways that people show up to take their plane home. Crazy stories. One guy apparently strapped the whole contraption to the top of a Jeep! I guess they don’t package anything up till they see you pull up and see how it is going to be loaded. Makes sense.
As I said, the airplane itself wasn’t the adventure. It was the trip there and back. I was about 20 minutes away from my hotel stop in Seneca, SC (4.5 hours into the trip), on Hwy 123, when I looked in the median and saw a mini van down towards the bottom of the grass. 123 is a divided highway with a wide median. The minivan had left muddy ruts through the grass on it’s way towards the bottom. I saw a man standing outside the minivan, looking a bit dejected. As I sped past at 70 mph, I thought, “Minivan = family. Dad is outside trying to figure out what to do, family is inside staying safe. Ugh, can’t leave a family there to rot. I have a jerk strap in the tool box. I can swing back around, run the jerk strap down to him and then hook it to my trailer. I’ll lock four wheel drive in, pull him back up to the asphalt edge, and then be outta here. 15 minutes, no problem.”
So I exit off, circle back around, and then come up on the minivan. I slow to about 30 mph as people barrel up behind me doing 75. I ease off the road, still pulling a 5000 lb trailer behind me. Just as I leave the asphalt, I’m on glass. The truck just keeps on plowing and I wonder if I’m going to stop. After a second I get control and get the truck stopped. Once stopped, I try to edge forward. Nothing. Backwards? Nothing. Even though I’m much closer to the road than our minivan, I’m stuck in what I now realize is VERY soft dirt. I turn the truck off, hop out, and with a big smile say to my new neighbor in stuckness, “Well at least you have company now to keep it entertaining. Now we are both stuck!”
He smiles and I reassure him we’ll get out. I take a look at the status of the truck. About 3-4″ deep mud where the tires have been. Beautiful roadside grass everywhere else. No indication that it would be this soft. Oh well. I ask if he has his family with him.
“Yep.”
I ask who was driving when they pulled off.
“Me.”
I ask, “Is she mad at you?” with a big smile.
“Yes.”
“Best stay over here with me then, it is safer!” I say with a laugh. I find you can either laugh or cry in situations like this. Better to laugh if you can. Nobody is shooting at us. Nobody is dying. So in reality it is just an adventure.
After taking a look at the truck and the soil, I harken back to my surfing days when I used to go surfing with my friends. I learned from Jim that before you go out on the beach, you let the air in your tired down from highway pressure to 15-20 psi. This softens the tires and improves the ground pressure. I’ve seen trucks buried nearly to the frame magically levitate out of a hole once the air pressure was dropped. My tires are setup for carrying a load on a 1 ton pickup. They run at 70 psi. As I chatted with the dad, I started letting air out of the tires.
While I was letting air out, a wrecker stopped at the minivan, which was still 100 yards ahead of me. He pulled 1/2 off the pavement and half on (he’s a professional). After a quick chat with dad, he decided to leave. Except that even 1/2 on the pavement, he got stuck. I watched him for a while slipping and spinning while I was letting my air out. He eventually used some of his wrecker equipment to get himself back onto the pavement and he left.
It took about 30 minutes to get me to 20 psi. I gave the truck a try. Nope, while I could move I couldn’t get back to the pavement. I let another 5 psi out and ran them at 15. After much back and forth, I was able to get one tire onto the pavement. Viola! With a 4 wheel drive truck, one tire is all I need. Thanks Jim! You never know when a life lesson from surfing will come in handy as an adult.
I pulled my now exceedingly muddy truck down to just ahead of the minivan and hopped out. I was 1/2 on, and 1/2 off the road, with no wrecker lights to guard me. Also, in the 1 hour we were there, no cop ever came by even though the minivan driver had called them immediately after getting stuck. Oh well.
About to pull the minivan out of the mud
I got out of the truck, pulled out the jerk strap, and handed it to the dad. I explained how I wanted him to hook it up to the minivan, that I didn’t want to damage anything while pulling it out. I also explained, quietly to him, that I was going to have him get down in the mud and hook everything up. He’d get muddy, but he’d be a hero to his wife and kids. If I did it, he’d be the idiot who got them stuck and I’d be the hero. No good. He nodded and went to work.
While he was finding a spot to hook things up, a kid came up to me from seemingly nowhere.
“What’s wrong?! Is everybody ok?!”
“Um, yeah. Just stuck. I’m getting them out. Where did you come from?”
I looked over his shoulder, and across the highway. A Ford Mustang was nose down off the shoulder on the opposite side of the road. I seriously doubted he’d be able to back up that incline even if the ground was firm. No way with as wet as it was. Ugh! Now I had to get him out as well.
I thanked the kid for stopping and told him his a very generous to risk himself to help. Just hang out a minute and I’d get him unstuck as well.
After some fiddling with straps, ropes, etc, we finally got hooked up, the lower A arm on the van hooked to the back of the trailer seemed to be the best way although we tried the tie down ring on the front as well. I explained how this was going to work, and we pulled the minivan through the mud and back up to the asphalt. While we were getting straps off and prepping to cross the highway and get the Mustang out, I hear some guy barking orders. I look up to see what looked like a fireman type guy in a pickup truck, yelling to the dad that my truck needed to be gotten off the road before we caused an accident.
“Thank you self important fireman looking guy for your completely asinine insight.”
I’d been really jovial up to that point. Helping people is fun. That guy made me pretty mad. But I just chewed my lip and he drove off. Thankfully I never actually talked to him or I may have said something not quite so friendly.
Mom and the kids took off, leaving dad to help me get the Mustang out. Mustangs have a solid rear axle because apparently 1960s technology doesn’t need to be updated. It also makes for an excellent place to hook a tow strap. We hooked the jerk strap to the axle, then to the front recovery hooks on my truck. This was after crossing a highway on wobbly tires, covered in mud, while pulling a trailer. Fun.
After taking up the slack, I backed the kid out and got him on the road. I thanked him again for being willing to stop and sent him back to Clemson where he was a student.
During this time, an Army veteran had stopped and was offering to help as well. With the kid gone, mom picking up the dad, covered in mud and grease, and wobbly tires, I drove the Army guy back to his vehicle which miraculously wasn’t stuck at all, and bid him farewell.
Then I hopped back onto 123 and went to the next exit on tires that were woefully under-inflated to be on the highway. I’m still pulling a trailer and now hunting around for a gas station where I can put air in them. It’s about 5:45 and getting dark on a Sunday night. I’m getting nervous that I won’t be able to find air in this tiny little town. I do carry a portable air compressor that runs off of 12 volts, but it takes FOREVER to pump any volume of air. It truly is a last ditch tool. Plus I haven’t used it in forever so who knows if it even works.
I find the only gas station in town, find their air compressor, drop 75 cents in it, and it springs to life! Yeah! So much for no good deed goes unpunished. I fill up as best I can the two closest tires and I can tell by the end that the little pump is doing about all it can. I pull out my tire gauge and it says 28psi. I run at 70psi. Ugh. That isn’t good.
Another 75 cents and I get 28psi on the other side of the truck. Now I can run at low pressure but not very far nor very fast. I look at my hotel directions and I’m only 15 miles from the hotel. It’s now full dark and Sunday night. Better to be at the hotel and figure it out tomorrow. I limp to the hotel, grab a bite, and grab some shut eye, on the way noting places that might have air at 8am on a Monday.
When I look at my distance from the hotel to the factory, I find that it is only 7 miles to the factory. So I could be at the factory at 7am and get air there, or I can wait till 8am, get air in town, and then show up at probably 8:30 or so. Since I have to drive 9.5 hours that day, I go to the factory where after grabbing every air hose in the place, we stretch out enough hoses that I can spend 30 minutes, even with their really good air pressure, filling my tires back up to normal.
Waiting to load the airplane while sweet, sweet pressurized air flows into the tires.
Since I had three hours to spend, I was able to look at a lot of the factory again, and talk to a number of folks. But that is part of the next story.